Office 365 Configuration
![]()
How to Connect to Office 365
When integrating a Calendar with Poly Lens, the application requires permission to access calendar entries and to allow the application to pass this information to Poly Lens. Enable Office 365 Calendar to authenticate Poly Lens Calendar Integration as an Application and claim your Office 365 tenancy. You must have Microsoft Admin privileges to accomplish this task. Once the integration is applied, complete the set up by assigning the Calendar to each Room.
Poly Lens Security Requirement
In order to successfully integrate Microsoft O365 Calendar with Poly Lens, a Microsoft Exchange Administrator or Microsoft Privileged Role Administrator role must be used to authorize the O365 Calendar integration in your Poly Lens tenant (account).
If the Poly Lens Tenant is also integrated with EntraID for Auth, the Admin user performing the integration must use an identity from the same domain that was integrated with Active Directory (AD). The Admin user must have the appropriate permissions within O365 to execute the integration.
This security requirement ensures that the integration process is authorized solely for the organization's Poly Lens Tenant and that the Poly Lens Admin identity is consistent with the same Microsoft domain for EntraID and O365 Calendar integration.
Application
When you connect as an application the Poly Lens service is integrated into your Office 365 subscription as an authorized application.
This provides the Poly Lens service with access to user and room resource account calendars in the organization. The Poly Lens service will appear as an integrated application in the Office 365 Administrator Portal where it can be removed at any time; thus removing access.
Note: This method will use OAuth2 authentication to connect, which means you do not share credentials directly with Poly Lens.
Connect to Office 365
Allow Poly Lens to read the Office 365 calendars. Connecting as an application grants Poly Lens the ability to read the calendars in your organization. You must be an Office 365 global admin of your organization to connect as an application.
- Go to the
 Admin menu > Integrations.
 - Select Office 365 Calendar.
- Enable with the slider Allow Access.
- Authenticate using the Office 365 global admin account for your organization.
- Select your Microsoft global admin account for your organization. Note: Regarding the global admin consent or to review app permissions directly, see Link to the Admin Approval Flow.
- Select Apply.
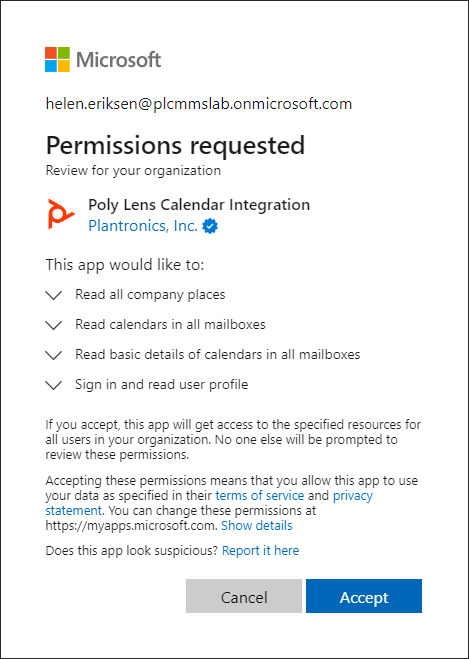
- Select Accept on the Microsoft Permissions Requested window.
- You will be redirected to the Poly Lens cloud and can now view the integration status.
Disconnect
Disconnect the calendars by removing the calendar integration.
- In Integration > Office 365 Calendars, select the slider to disable the Calendar.
- Select Apply.
Reconnect
If you are already integrated to Office 365 but need to reconnect the integration, you may do so. This might be necessary if you disable Poly Lens access in your Office 365 administrator page, or if the access token used by Poly Lens fails to connect.
- In Integration > Office 365 Calendars, select the slider to enable the Calendar.
- Select Apply.
Limiting Access
You may limit the Poly Lens permissions to specific online mailboxes by creating an application access policy.
Note: The Poly Lens AppId is b87c9024-69bf-4b09-9ba2-73bbb85adc4d.
The following is an example of a Microsoft PowerShell command to create a new application access policy.
New-ApplicationAccessPolicy -AccessRight RestrictAccess -AppId "b87c9024-69bf-4b09-9ba2-73bbb85adc4d" -PolicyScopeGroupId RoomResources@AppPolicyTest2.com -Description "Restrict Poly Lens App to members of security group RoomResources."
For more information, see the following: Application Access Policies.
Room Setup
To complete the setup, configure the Room.
- Select Manage > Rooms, and select a Room from the list of Rooms.
- The Office 365 Calendar needs to be enabled, see Connect to Office 365.
- Select Settings from the side tabs.
- In the Calendar field, select a Calendar from either the dropdown list, or manually entering the Calendar name.
- Select Apply to save the Calendar integration into the Room.
Note: The Calendar Status will display Syncing. When the integration is complete Integrated will display, or Failed if an error occurred. Refresh the Room Overview page to update all displays.
Remove or Re-assign a Linked Calendar
- Select Manage > Rooms, and select a Room with a connected calendar from the list of Rooms.
- Select Settings from the side tabs.
- In the Calendar field, select a Remove Selected Calendar to remove the Calendar, or select a different Calendar from either the dropdown list, or manually entering the Calendar name.
- Select Apply to save the Calendar changes.
Calendar Details
For information on Status Details see Office 365 Calendar Details.
Troubleshooting
For troubleshooting information for Office 365 Calendar, see Office 365 Calendar Troubleshooting.